
How To
Insert Table In Blog Using Microsoft Word

Adding table into blog post is good way to organize data in tabular
form. It is always a good practice to add table in blog post wherever necessary
because the readers are much comfortable in reading article that uses table.
Currently Blogger team doesn't provide any option in post editor to add table
in article directly.
Writing HTML is time consuming task but there is some
easy way to do this. Sometime you may have need to add table in blog post but
due to non-availability of such option in Blogger post editor, you used custom
HTML tables. As we know that many bloggers are not familiar with HTML
technologies, that’s why they find problem in making tables for their article.
As Tables are extremely helpful if you are showing some data in
tabular form within post or when you are comparing the specification of some
services or products. Even if you are familiar with HTML then also it saves lot
of time.
Advantage Of Using Microsoft Table
1.
It can be easily created and insert into post.
2.
No HTML skills required.
3.
Easy Customization.
4.
All Browser compatibility.
5.
Large Number of available background Designs and Layout Design.
How To Create Table In Microsoft Office
First of all, Microsoft Office 2007 or 2010 should be installed
on your computer download it from official site, if it already installed in
your computer then open Microsoft Word. From the top menu bar,
click Insert option and choose Table option.
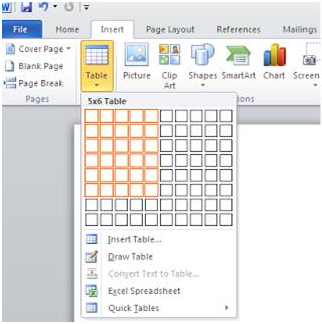
From the grid list, select rows and columns for table and it
will display its corresponding result. Now you will get a default table of
chosen size added in Microsoft word. Now we will add some gorgeous design for
it.
Look for Design from top menu and you will find lot of
different design which you can select from just one click.

When you done with this table click Save as to
save table file and choose Web Page, Filtered as Save as Type.

How To Use Microsoft Table In Blog Post
Now you have one saved HTML file that contain your stylish table
which you just created in Microsoft Word. Open this file in Notepad and copy
whole code form <table to </table> tag.

Go to Blogger post editor, click HTML button
and paste the code at position where you want table to appear
remember that don't place code in Compose mode.

As a Demo, we are attaching some HTML table created with same
method.

Have you seen all these tables ? I am pretty sure that you like
all of these but its not the end you can create much professional tables
from MS word. Now its time for you to write blog post with good
looking highly customized tables.
If any further query or suggestion remained in your mind you can clear out by
making useful comment in below section or if you like this article, then don't
forget to subscribe it for latest updates.
No comments:
Post a Comment
We’re eager to see your comment. However, Please Keep in mind that all comments are moderated manually by our human reviewers according to our comment policy. Let’s enjoy a personal and evocative conversation.